

 Ever walk into a home that’s been staged and say “Wow! THIS is the home and look I want.” But when all the documents are signed and it comes time to put your own stamp on the place, you find yourself feeling a little lost?
It’s actually something I hear clients talk about a lot.
They yearn for that “buy me now!” look that the house originally had. But maybe they are on a budget, or they come to me after years of living in the home, when the more apt title for their look is “update me now!”
After all, staging is the ultimate illusion; or rather, it’s the best kind of makeup you could apply to your residence. It makes a home look shiny and untouched, because at that moment, and only then, the house is shiny and untouched.
So is a staged look in a lived-in home an impossible dream?
I’m here to tell you it’s not.
In fact, I’ve got a project in mind that illustrates this point pretty well.
The couple who owns this home, along with their three sons, learned of me through a business relationship they have with another customer of mine. They had just moved into the home in the fall and did not have much in the way of furnishings.
But they wanted to recapture that fresh and catchy ‘Wow’ look that drew them to the home in the first place.
So we went to work.
They had a smaller budget for the project, so I leaned heavily on some tricks of the trade that give you more bang for your buck in the design world.
Smaller updates throughout. Fresh accessories. Playing with scale and orientation of furniture. Mixing new with the old in a way that updated the overall look.
Let me give you some examples.
 We were working around their existing dining room, so I let that dictate the style throughout. It’s mostly a traditional design, but leaning transitional.
Just a couple updates were enough to freshen the room. I added new draperies, and some accessories.
And they liked the current wall color, so I added a coordinating rug to anchor the space. Then I carried the bluish-teal color into the great room.
In working with the great room and also the breakfast area, I again pulled out some tools from my designer’s toolbox.
For instance, we completely reorganized their accessories. I used some of their lamps and pictures from other areas of the house, and mixed in some items from local shopping places with the pieces I thought were important.
Some items also ended up in their bar and powder room.
And that leads me to another tip that I’d like to share with you.
Many people put way too many smaller items in and around their homes. It’s completely normal — we all have some degree of an inner pack rat.
 But it’s not usually what’s best for your look.
While it can be tempting to buy up each and every accessory that speaks to you, you can achieve a much more appealing design when you focus on a few key pieces and work on a larger scale.
So that’s what I tried to do here..
Note the new painting in the dining room. It’s slightly bigger than the old painting, and incorporating more of the room’s colors. And just that single update carries the room forward.
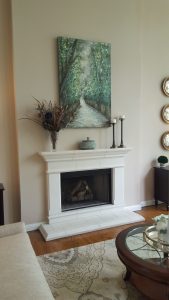
The hearth area in the great room follows the same concept. I also used repetition and symmetry to make the whole setup visually pleasing.
You’ll also see that many of the accessories carry that same beloved teal color through to other sections of the house. This helps establish continuity, and also helps make each piece stand out.
Overall, I feel we were able to accomplish quite a lot with only a little rearranging and new purchases. That, to me, proves that anyone can benefit from staging!
I am currently working on the couple’s master bedroom to achieve the same look. I’ll try to update you on the project as it progresses.
Thanks as always for reading my blog, and remember to contact me if you’d like some help freshening up your home!